Creating Custom Test Limits
You can create up to 10 custom test limits. Each custom limit can include up to 5 fiber types.
1. Press Functions then select Edit Custom Test Limit.
2. On the CUSTOM LIMIT LIST screen, do one of the following:
Select an existing custom limit to edit.
Press F1 Add Limit to select any existing limit as a baseline for a new limit.
注
When you add a new limit, 3 generic fiber types are placed in the new limit by default.
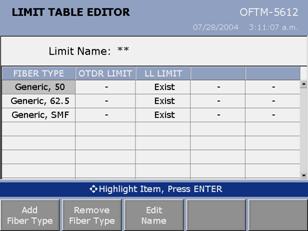
3. Use the LIMIT TABLE EDITOR screen to see or define test parameters for the fiber types you will test. Below is an example of this screen.

To see the properties of a factory-installed fiber type or to edit the properties of a custom fiber type already used in the limit, use
 to highlight a fiber type; then press ENTER. to highlight a fiber type; then press ENTER.
注
Selecting a factory-installed fiber type lets you see the fibers properties, but you cannot edit them.
To add a fiber type to the custom limit press F1 Add Fiber Type; then select a fiber type from the list or press F1 Create Fiber Type to create a new type. See the previous section for details on fiber properties.
To remove a fiber type, highlight the fiber; then press F2 Remove Fiber Type.
3. To add or edit test parameters, use  to highlight a limit cell in the table; then press ENTER. It is not necessary to enter test parameters for tests you will not run. to highlight a limit cell in the table; then press ENTER. It is not necessary to enter test parameters for tests you will not run.
4. When you are finished entering test parameters on the LIMIT TABLE EDITOR screen, do one of the following:
To save the custom limit using the existing limit name, press SAVE.
To edit the name, press F5 Edit Name. Press SAVE when you are finished entering a limit name; then press SAVE again to save the limit. |