Toning in IntelliTone™ Mode - MicroScanner2
Using the Toner
You can use the tester with an optional tone probe to locate cables in bundles, at patch panels, or behind walls.
Use the tester’s IntelliTone™ mode with an optional Fluke Networks IP100 or IP200 tone probe. The digital IntelliTone signal is easier to detect at a distance than analog tones, and its frequency and encoding eliminate cable misidentification due to signal bleed and radiated or ambient noise.
The tester’s analog tone mode is compatible with most tone probes.
The analog tone mode features the SmartTone™ function for positive identification of cables in bundles.
Toning in IntelliTone™ Mode (optional IntelliTone probe required)
Refer to Figures 1 and 2.
- Connect the tester to the cable.
- Press PORT to select twisted pair or coaxial cable.
- Press MODE until MUSIC NOTES appear, IntelliTone, and a scrolling pattern of 1s and 0s appear on the display (1, 2, and 3 in Figure 1).
- To toggle between the two IntelliTone songs press UP ARROW then DOWN ARROW. The display shows the song number 4.If you press DOWN ARROW or UP ARROW repeatedly, the tester cycles through the IntelliTone and analog songs.
- Turn the probe’s rotary switch to Locate.
-
Use the probe to find the general location of the tone at a cable rack, patch panel, or behind a wall, as shown in Figure 2. The SYNC LED lights up green when the probe is receiving the IntelliTone signal.
The probe’s LEDs light up from 1 to 8 as the signal strength increases. The higher the number, the stronger the signal.
Notes: If you cannot locate the IntelliTone signal on 2-conductor cables, the cable may be shorted. Use the tester to check for shorts. - Turn the probe’s rotary switch to Isolate.
- Use the probe to isolate the tone source in the cable bundle or at the patch panel. The SYNC LED lights up green when the probe is receiving the IntelliTone signal.
- The probe’s LEDs light up from 1 to 8 as the signal strength increases. The higher the number, the stronger the signal.

图 1. IntelliTone Toner Mode Display
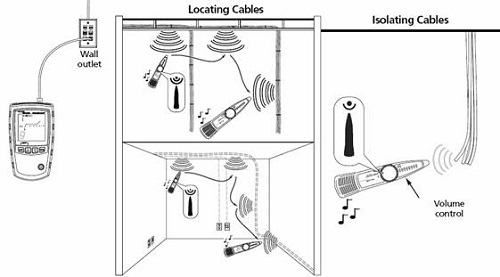
图 2. Using the Toner in IntelliTone Mode
Analog Toner Mode (optional tone probe required)
Refer to Figure 3.
- Connect the tester to the cable.
- Press PORT to select twisted pair or coaxial cable.
- Press MODE until MUSIC NOTES appear on the display 1; then press DOWN ARROW to enter analog toner mode. The display shows a scrolling sinewave in analog toner mode 2.
- To change songs, press DOWN ARROW. The display shows the song number 3. The analog toner has four songs.
- If you press DOWN ARROW or UP ARROW repeatedly, the tester cycles through the analog and IntelliTone songs.
- Use the probe to search for the cable.
图 3. Analog Toner Mode Display
Using the SmartTone Function
Use the SmartTone™ function when you have trouble locating a cable. This function changes the toner’s song when you short a wire pair in the cable connected to the tester. SmartTone works with the IntelliTone probe and with analog probes.
Note: Use the SmartTone function only on dry pairs of wires that are unterminated at both ends. Do not use this function on powered wires.
- Press PORT to select twisted pair or coaxial cabling.
- Press MODE until MUSIC NOTES appears on the display.
- Press DOWN ARROW to select the analog toner mode (IntelliTone disappears from the display).
- At the far end of the cabling, place the probe near the ends of the cables.
- Momentarily short a wire pair in a cable (twisted pair) or short the conductor and shield in a cable (coaxial). If the song changes when you release the short, you have found the cable connected to the tester.
Using the IntelliTone Cable Map Function (optional IP200 probe required)
The tester’s IntelliTone function works with an optional IP200 probe’s cable map function to verify wiring at the far end of the cabling. The probe’s cable map function identifies the most common wiring faults on twisted pair cabling: shorts, opens, and crossed pairs.
- Press PORT to select twisted pair cabling.
- Turn the probe’s rotary switch to CABLE MAP.
- Connect the tester and probe to the cabling as shown in Figure 4.
- Press MODE until MUSIC NOTES appears on the display. IntelliTone mode is indicated by IntelliTone and a scrolling pattern of 1s and 0s on the display. 参见图 4。
- The probe’s LEDs light in sequence to indicate the cable’s wiring. See the probe’s documentation for details.
注意:Normally, the probe’s SYNC LED lights to indicate reception of the IntelliTone signal. You may change the LED’s function to indicate shield continuity. See the probe’s documentation for details
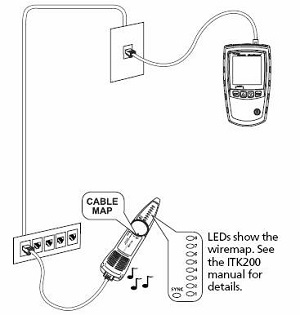
图 4. Using the Toner with the IP200 IntelliTone Cable Map Function